in teh vibrant world of baking, where flavors and textures dance in delightful harmony, gluten-free cake decorating emerges as a unique art form-one that marries creativity with careful craftsmanship. “Sweet Artistry: Mastering Gluten-Free Cake Decorating Tips” invites both novice bakers and seasoned pastry artists to explore the nuances of decorating without gluten. From selecting the perfect flour blends to achieving flawless frosting finishes,this journey is about transforming dietary necessity into a canvas of edible beauty.Whether you’re crafting treats for loved ones with gluten sensitivities or simply seeking to expand your baking repertoire, these expert tips will inspire you to create stunning cakes that look as astonishing as they taste-gluten-free, and guilt-free.
Choosing the Perfect Gluten-Free Flours for Flawless Cake Texture
Sweet Artistry begins with selecting the ideal gluten-free flours that transform your cakes into moist, tender masterpieces.Unlike customary wheat flours, gluten-free options require thoughtful blending to replicate that signature crumb and structure. For a flawless cake texture, a combination of almond flour, brown rice flour, and tapioca starch works wonders, marrying moisture, chewiness, and lightness.
Almond flour lends a natural buttery richness while keeping cakes perfectly moist, brown rice flour provides a mild nuttiness and sturdiness, and tapioca starch adds the elasticity missing without gluten. When paired with a quality binder like xanthan gum or guar gum, your cake will rise beautifully and slice smoothly without crumbling. Each flour’s unique properties create layers of flavor and texture, making every bite a delight.
Crafting Vivid and Stable Frostings Without Gluten
Building on the flawless crumb, a stable frosting adds the canvas for your edible art. Gluten-free frostings, when properly made, can hold vibrant colors and firm peaks without any gritty textures. The secret lies in starting with a well-whipped buttercream or cream cheese base whipped to soft peak consistency, then gradually adding powdered sugar to avoid graininess.
For vivid colors, gel-based natural food colorings work best without diluting the frosting’s consistency. Stabilizers like corn starch or a touch of cream of tartar can enhance durability for intricate decorating sessions or warm environments. Allow your frosting to chill slightly before piping or smoothing to ensure perfect, clean edges and delightful flavor balance.
Techniques for Smooth Fondant Submission on Gluten-Free Cakes
Applying fondant on gluten-free cakes calls for gentle handling to maintain that perfect, smooth finish. Since gluten-free cakes can be more delicate, a thin crumb coat of buttercream is crucial to lock in crumbs and provide a tacky surface for fondant adherence. Roll your fondant to an even 1/8-inch thickness on a clean, powder-dusted surface-cornstarch works beautifully without altering taste.
When lifting the fondant, a pasta roller can definitely help achieve uniformity, and using a fondant smoother in swift, gentle strokes really polishes the surface to a satin finish. If slight cracks appear, warm your fingers to gently seal them or use a tiny bit of vegetable shortening. the goal is a flawless canvas ready to showcase your creative designs.
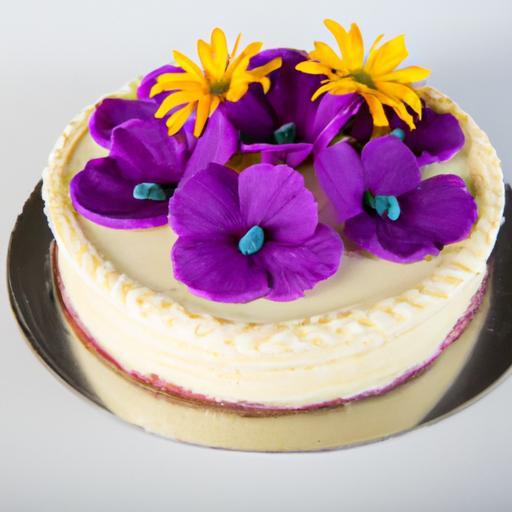
Decorative tips to elevate Your Gluten-Free Cake Creations
Turning your gluten-free cake into a striking centerpiece involves a few inspired decorative approaches. Incorporate edible flowers, gold leaf accents, or textural contrasts like crisp meringue kisses to boost visual appeal.For piping, use star or leaf tips with firm, slightly chilled frosting to hold shapes crisply.
Layering colors and mixing matte with glossy finishes creates depth and interest. Personalized touches, such as hand-painted botanical motifs with food-safe brushes and gel colors, bring individuality to each creation. Remember, every stroke celebrates the artistry behind gluten-free baking-bold, gorgeous, and brilliantly yours.
Prep and Cook Time
- Readiness: 30 minutes
- Baking: 35-40 minutes
- Cooling and Decorating: 1-2 hours
Yield
Serves 12 generous slices
Difficulty Level
Medium – perfect for enterprising home bakers ready to master gluten-free decorating techniques
Ingredients
- 1 cup almond flour
- 1 cup brown rice flour
- ½ cup tapioca starch
- 1 tsp xanthan gum
- 1 ½ tsp baking powder (gluten-free)
- ½ tsp baking soda
- ½ tsp salt
- 1 cup unsalted butter, softened
- 1 ¼ cups granulated sugar
- 3 large eggs, room temperature
- 1 tsp pure vanilla extract
- 1 cup buttermilk, room temperature
Instructions
- Preheat your oven to 350°F (175°C). Grease and flour two 8-inch round pans with gluten-free flour.
- Whisk together the almond flour, brown rice flour, tapioca starch, xanthan gum, baking powder, baking soda, and salt in a medium bowl. Set aside.
- In a large bowl, cream the butter and sugar with an electric mixer on medium-high speed until light and fluffy, about 3-4 minutes.
- Add the eggs one at a time, mixing well after each addition. Stir in the vanilla extract.
- Alternately add the dry ingredients and buttermilk to the wet mixture, beginning and ending with dry ingredients. Mix gently until just combined. Avoid overmixing to keep the crumb tender.
- Divide the batter evenly between the prepared pans and smooth the tops.
- Bake for 35-40 minutes or until a toothpick inserted into the center comes out clean. Rotate pans halfway through baking for even color.
- Allow the cakes to cool in pans for 15 minutes before transferring to wire racks to cool completely.
Chef’s Notes
- Flour variations: You can swap brown rice flour for sorghum flour for a slightly sweeter, more aromatic crumb.
- Frosting tips: Chill the kernels of your frosting bowl before whipping for a fluffier texture that holds shape.
- Storage: Cover cakes tightly with plastic wrap and store at room temperature for up to 2 days or refrigerate for up to 5 days.
- Make-ahead: Bake layers a day in advance and wrap tightly; bring to room temperature before decorating.
- Common troubleshooting: If your cake feels dry, add an extra egg yolk or an additional 2 tbsp of buttermilk next time to boost moisture.
Serving Suggestions
Slice your cake with a serrated knife for clean, even cuts. Pair with fresh berries or a sprinkle of toasted nuts on top for texture contrast.A dusting of powdered sugar or a drizzle of gluten-free chocolate ganache adds a luxe finish. For presentation, place on a decorative stand surrounded by delicate edible flowers or fresh mint leaves to highlight the artistry behind your creation.
| Nutrient | per Serving |
|---|---|
| Calories | 320 kcal |
| Protein | 6 g |
| Carbohydrates | 28 g |
| Fat | 20 g |

Discover more advanced techniques for gluten-free baking in our Gluten-Free Baking Basics guide. For extensive scientific insight into gluten-free flour blends,visit Celiac disease Foundation.
Q&A
Q&A: Sweet Artistry – Mastering Gluten-Free Cake Decorating Tips
Q1: What makes decorating a gluten-free cake different from a traditional cake?
A1: Gluten-free cakes often have a denser,more delicate crumb due to the absence of gluten’s structural network. This means decorators must handle them gently and choose frosting types that complement this texture.Sharp knives and lighter pressure during layering help maintain the cake’s integrity while decorating.
Q2: Which gluten-free flours work best to create cakes with a smooth surface for decorating?
A2: Blends that include rice flour,tapioca starch,and almond flour tend to produce cakes with a tender yet stable crumb,perfect for smooth finishes. Using a combination rather than a single flour helps mimic the elasticity of gluten,giving decorators a smoother canvas.
Q3: How can I prevent gluten-free cakes from crumbling when applying fondant or buttercream?
A3: Start by chilling the cake thoroughly before decorating, which firms it up. Apply a crumb coat-a thin layer of frosting-to seal in loose crumbs. Cooling the crumb coat briefly creates a smooth base for additional layers. Choosing a frosting with good adhesion, like cream cheese or Swiss meringue buttercream, helps the fondant stick without shredding the cake’s surface.
Q4: Are there any frosting tips specifically for gluten-free cake decorators?
A4: Yes! As gluten-free cakes can be more moist, opt for frostings that aren’t overly watery, as excess moisture can cause slipping. Buttercreams with stable textures hold up well. Also, keep your frosting at a spreadable consistency-not too stiff, not too runny-to glide over the cake’s surface smoothly.
Q5: What creative decorating ideas work particularly well on gluten-free cakes?
A5: Edible flowers, fresh fruit, and piped details shine on gluten-free cakes. Because these cakes can sometiems be lighter in appearance, vibrant colors and textures can add extra visual interest. For example, piped rosettes using naturally tinted buttercream bring elegance without overwhelming the cake’s delicate base.
Q6: How can I ensure my gluten-free cake decorations stay fresh longer?
A6: Store decorated gluten-free cakes in a cool, dry place, ideally refrigerated if using perishable frostings like cream cheese. Use airtight containers when possible to prevent drying out. Since gluten-free cakes can be more sensitive to moisture, avoid wrapping them too tightly or placing them near humidity sources.Q7: What’s a common mistake to avoid when decorating gluten-free cakes?
A7: One big pitfall is applying heavy decorations or multiple layers without proper chilling, which can cause the cake to crumble or become misshapen. Patience is key: chill between steps and work gently to maintain the cake’s shape and texture.
Q8: Can I use traditional piping tips and tools on gluten-free cakes?
A8: Absolutely! The decorating tools remain the same. The difference lies in adjusting pressure and speed to suit the cake’s texture. Practice steady, light hands to achieve crisp lines and shapes without disturbing the crumb.
Q9: How do I achieve sharp edges on a gluten-free cake?
A9: Use a firm crumb coat chilled to perfection, then apply a final frosting layer with a bench scraper or icing smoother. Work patiently in thin layers, smoothing as you go. Chilling between coats solidifies the frosting and allows for cleaner edges.
Q10: Any final advice for bakers diving into gluten-free cake decorating?
A10: Embrace the learning curve with creativity and patience. Each gluten-free recipe brings its own personality-experiment with textures and techniques to find what works best. Remember, the sweetest artistry comes from blending technical skill with personal flair!
The Way Forward
As you whisk together your gluten-free ingredients and let creativity take flight, remember that mastering cake decorating is as much about patience as it is indeed about passion. Sweet artistry isn’t confined to tradition-it blossoms beautifully in the gluten-free world, where innovation meets indulgence. With these tips in hand, you’re not just baking a cake; you’re crafting edible masterpieces that delight both eyes and taste buds. So,embrace the journey,experiment boldly,and let your gluten-free creations become the sweetest works of art on every celebration table.