


In the world of Indian cuisine, the humble roti is nothing short of a culinary marvel-soft, fluffy, and perfectly charred, it’s a staple that graces every dining table. But what if you don’t have a conventional tandoor oven at your disposal? Does that mean bidding goodbye to the magic of flawless rotis? Absolutely not! Welcome to the ultimate guide where kitchen ingenuity meets cultural tradition.”Flawless Roti magic: No Tandoor? No Problem!” unveils simple yet ingenious techniques to achieve that authentic tandoor-like texture and taste, right on your stovetop or griddle. Whether you’re a seasoned cook or a curious beginner, prepare to unlock the secrets of roti perfection-no specialized ovens required!
Flawless roti Magic unfolds when you bring the alluring puff and softness of traditional tandoor-cooked roti right onto your stovetop. The secret lies in a harmonious blend of precise ingredients, the right tools, and a practiced technique that transforms simple wheat flour dough into golden, tender rounds that puff perfectly with every flip.Whether it’s for an intimate weeknight dinner or an remarkable feast, mastering this art invites the warmth of Indian kitchens into your own home, offering roti that’s just as comforting and satisfying-without the need for a tandoor.
Prep and Cook Time
- Preparation: 15 minutes
- Resting Dough: 30 minutes
- Cooking: 10-15 minutes (for 6 rotis)
Yield
Serves 4 (makes 6 medium-sized rotis)
Difficulty Level
Medium – perfect for home cooks ready to elevate their flatbread skills
Ingredients
- 2 cups whole wheat flour (atta), finely milled and sifted
- ½ teaspoon salt
- ¾ cup warm water (adjust as needed)
- 1 tablespoon ghee or neutral oil (plus extra for cooking)
- Optional: 1 teaspoon besan (gram flour) for extra softness
- Extra dry flour for dusting
Essential Tools and cookware that Bring Tandoor Magic Home
To achieve Flawless roti Magic on your stove, certain tools replicate the intense, dry heat of a tandoor. A heavy-bottomed cast iron skillet or tawa is indispensable, as it retains and distributes heat evenly, giving that signature charred spot on your roti. A flat spatula helps maneuver the delicate dough with grace, while a kitchen towel or cloth assists in gently pressing and flipping without tearing. Using a small wire rack or griddle lid can trap heat above the roti to help it puff fully. these humble tools turn your stovetop into a mini tandoor, unlocking authentic texture and flavor.
Step by Step Techniques to Achieve Flawless Roti on Your Stove
- Mix the whole wheat flour and salt in a large bowl. Gradually add warm water, stirring gently with your hand or a wooden spoon to form a soft dough.
- Knead the dough on a lightly floured surface for 8-10 minutes until smooth and elastic. Add the ghee to incorporate silky richness. Cover with a damp cloth and let it rest for at least 30 minutes to hydrate fully.
- Divide the dough into six equal portions and lightly dust each ball with flour before rolling.
- Roll each portion into a thin, round disc about 6-7 inches in diameter. Keep the thickness even, dusting the rolling pin and surface to prevent sticking. Aim for a slightly translucent look when rolled thin enough.
- Preheat your cast iron skillet or tawa on medium-high heat until hot but not smoking. Test by sprinkling a few drops of water-they should sizzle and evaporate instantly.
- Place one roti on the skillet. Cook for ~30 seconds or until tiny bubbles form on the surface. Flip using a spatula and cook the other side for about 30-40 seconds.
- Direct Puffing: Now, using tongs, lift the roti off the pan and hold it directly over a medium flame (gas stove). The roti should puff up like a balloon within seconds. Rotate to puff evenly. If no flame, cover the pan with a lid for 20 seconds to trap steam and puff.
- Remove the roti from heat and lightly brush with ghee for softness and shine.
- Repeat the process for remaining dough balls, adjusting heat as necessary for consistent cooking.
Tips for Success
- Dough Consistency: A softer but not sticky dough ensures pliable rotis that puff beautifully. Adjust water slowly.
- Resting Time: Don’t skip resting the dough; it activates gluten, making rolling easier and improving texture.
- Rolling Technique: Use a light hand to keep the discs even and don’t over-flour, as this can toughen the roti.
- Heat Mastery: Maintain medium-high heat. too low and puffing won’t occur; too hot and the roti burns before cooking through.
- Make Ahead: the dough can be refrigerated for up to 24 hours; bring to room temperature before rolling.
- Substitutions: Besan (gram flour) is optional but adds softness, especially in dry climates.
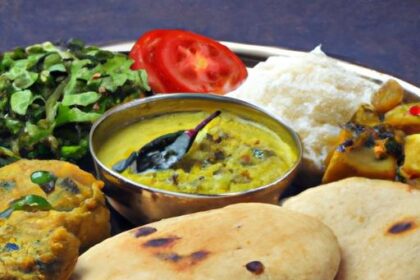
Serving Suggestions
Serve these golden soft rotis fresh from the pan, brushed with ghee and folded into warm stacks. Pair them with hearty dals, creamy paneer dishes, or vibrant vegetable curries. Sprinkle with freshly chopped cilantro or a squeeze of lime for a fresh zing. For an added touch of indulgence, dollop on a bit of plain yogurt or pickle on the side. This simple bread acts as the ultimate vehicle for soaking up rich sauces and vibrant spices, bringing every bite to life.

| Nutrient | Per Roti (approx.) |
|---|---|
| Calories | 110 kcal |
| Protein | 3 g |
| Carbohydrates | 22 g |
| Fat | 3 g |
For more insights on Indian flatbreads, check our Chapati vs Roti: what’s The Difference? article. For detailed grain profiles,visit The World’s Healthiest Foods – Whole Wheat.
Q&A
Q&A: Flawless Roti Magic: No Tandoor? No Problem!
Q1: Can I really make restaurant-quality roti without a tandoor?
Absolutely! A traditional tandoor is fantastic, but with a bit of technique and the right tools, your stovetop or oven can deliver perfectly puffed, golden rotis that rival any tandoor-baked bread.
Q2: What’s the secret to getting that perfect puff on a stovetop?
The magic lies in properly rolled dough, a hot pan, and timing. Roll your roti evenly thin, preheat your skillet until it’s very hot, and cook each side just long enough to get brown spots. Then, with a quick direct flame or a hot lid, the heat creates steam inside, causing the roti to puff beautifully.
Q3: Do I need special flour for flawless rotis?
No special flour needed! Whole wheat atta is traditional and works best for soft, pliable rotis. freshly ground whole wheat flour or good-quality store-bought atta both do the trick. Hydration and kneading are key-they make your dough elastic and easy to roll out.
Q4: How crucial is the dough resting time?
Very important! Letting the dough rest for at least 20-30 minutes after kneading relaxes the gluten. This reduces shrinkage when rolling and helps the rotis puff up nicely.
Q5: Can I make rotis ahead of time and reheat them?
yes, but fresh is best. To reheat, wrap the rotis in a damp cloth and warm them briefly on a skillet or microwave. This keeps them soft and prevents them from drying out or becoming tough.
Q6: Are there any tricks to avoid tough rotis?
Definitely! Avoid over-kneading and rolling too thick. Use warm water for kneading and allow the dough to rest. Also, ensuring you cook them quickly on high heat prevents them from drying out and becoming hard.
Q7: What can I use to mimic the direct flame effect of a tandoor if I don’t have a gas stove?
If you have an electric stove, you can use a hot cast-iron skillet or a heavy griddle. For that final puff, placing the roti under a hot broiler or even using a kitchen blowtorch briefly can create similar steam and puff effect.
Q8: Can I add herbs or spices to the dough for flavor?
Absolutely! Adding finely chopped cilantro, mint, ajwain seeds, or even a pinch of cumin can infuse your rotis with delightful aromas and a flavorful twist.
Q9: How do I store leftover rotis without them drying out?
Stack them with a layer of parchment or wax paper in between, wrap tightly in foil or a cloth, and keep in an airtight container. This maintains softness and freshness for the next meal.
Q10: What dishes pair best with homemade rotis from the stovetop?
Your flawless rotis will shine alongside rich dals, spicy vegetable curries, grilled paneer, or even simple chutneys. Their soft,warm texture is perfect for scooping and soaking up those vibrant flavors.
No tandoor, no problem-your kitchen is full of magic waiting to turn humble ingredients into perfect rotis!
Future Outlook
Whether you have a tandoor at your disposal or not, crafting flawless roti at home is entirely within your reach. With the right techniques and a bit of practice, your stovetop can transform into a mini tandoor, delivering that perfect puff, golden char, and irresistible softness every time. So next time the craving strikes, remember: no tandoor? No problem! Your kitchen holds all the magic you need to bring the authentic taste of fresh, homemade roti straight to your plate. Happy cooking, and may your roti always rise just right!